上篇文章介绍了 Jupyter 生态及重要组件的原理。基于之前的内容,本文介绍 Jupyter 二次开发的思路。首先介绍项目的需求,接着进一步介绍架构设计,进行demo的实现,最后进行总结。
需求 实现图数据管理分析 BI 平台的 Notebook Service,具备数据的探索、执行分析任务、sql 操作、spark 操作等功能。这个平台目前是单租户的架构,是 to b 的。一般是公司的数据分析团队使用,一个团队一般是十几个人,写代码用到 Notebook 的可能也就那么几个人。所以对性能和可用性没有像 to c 的产品要求那么高。
总结下来,我们的 Notebook Service 应该具备下面的功能:
提供给用户开箱即用的环境
隔离用户的环境,避免互相污染
接入 spark、adb、oss 等平台资源供用户进行探查、分析
目前打算先快速把架构搭起来,先使用自带的 IPython 内核,后面再接入平台的对象存储、数据库和 spark 集群等资源。
架构设计 经过调研,决定采用下面组件来组合实现:
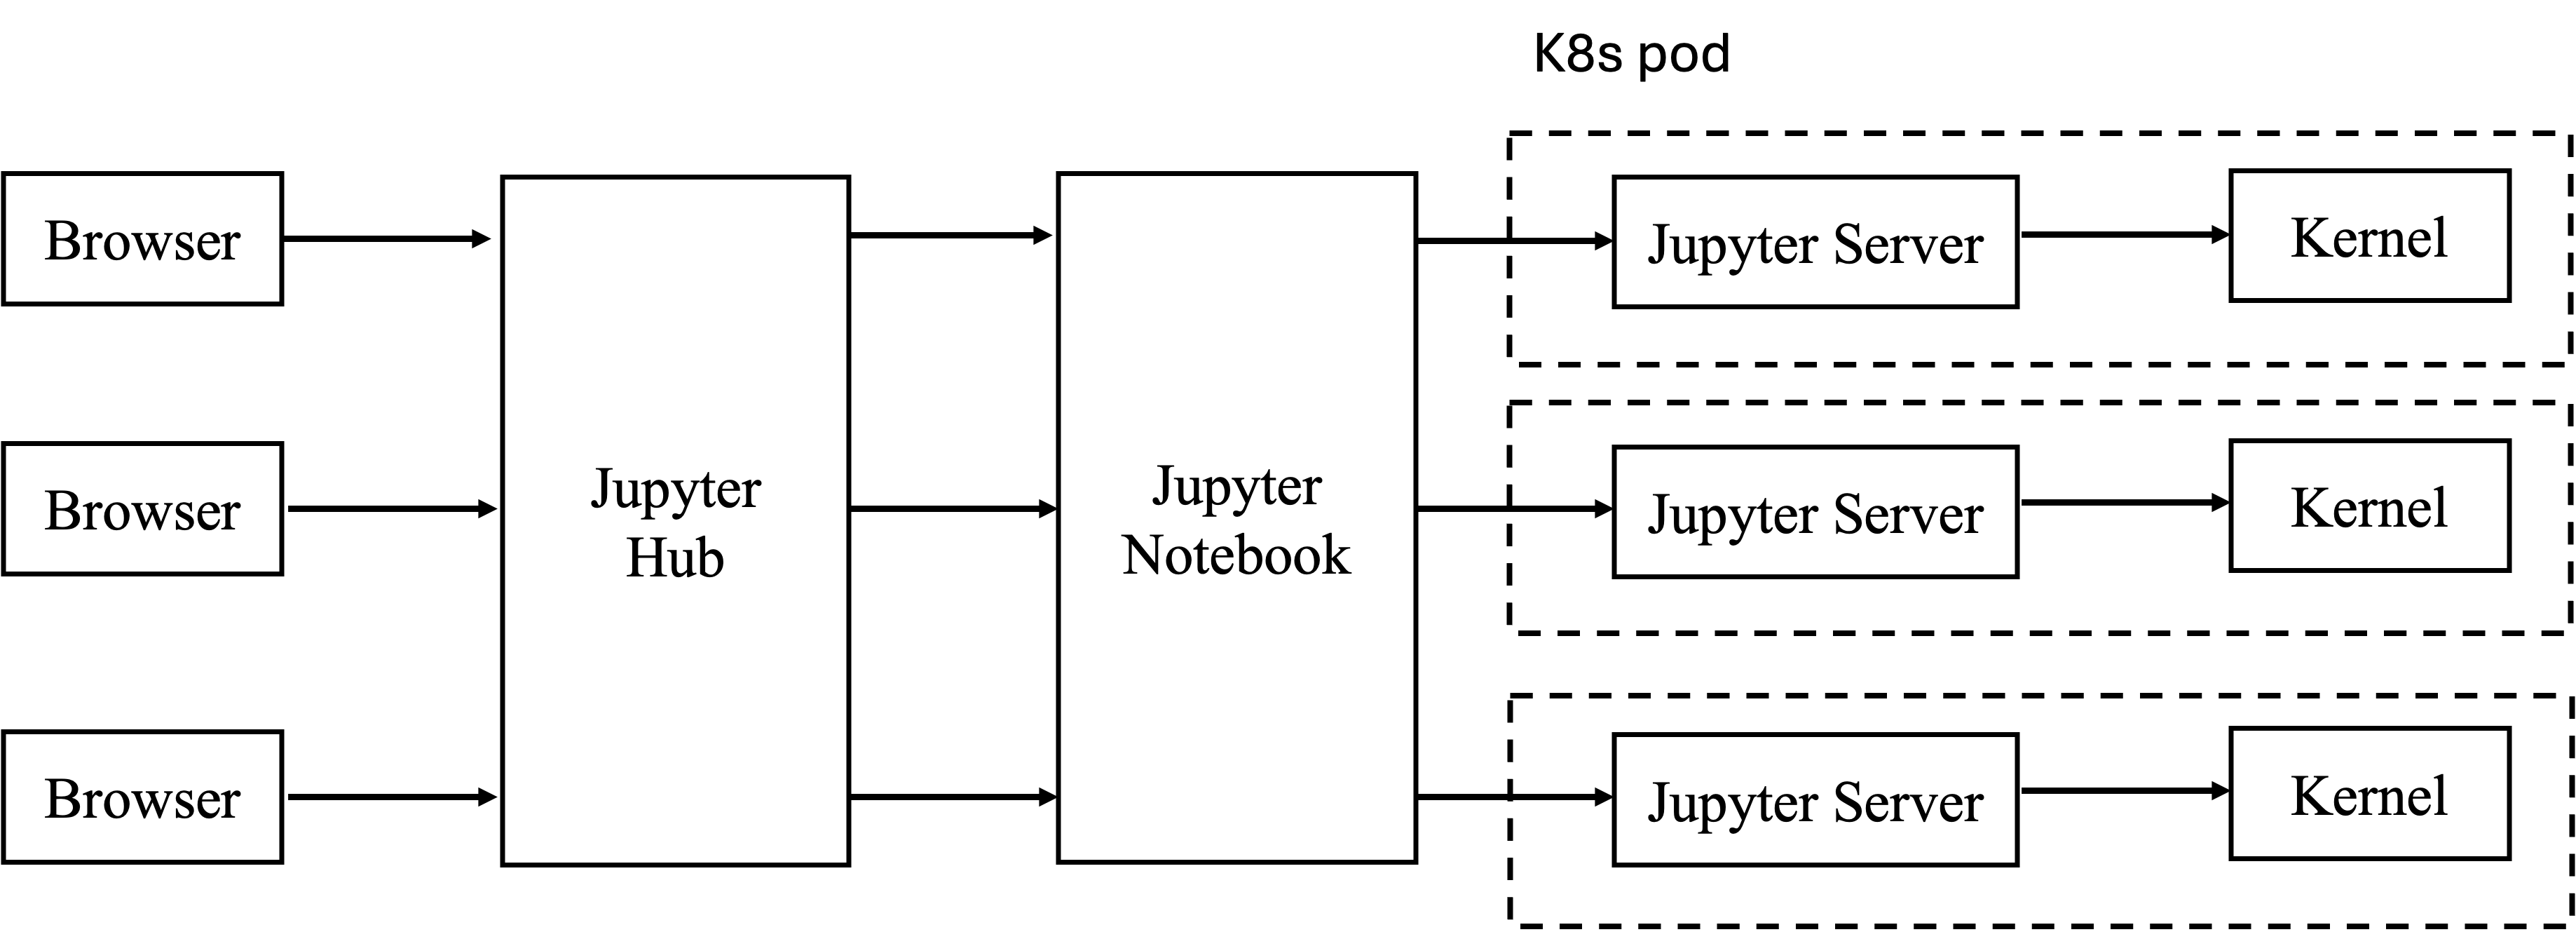
前端 使用经典的 Jupyter Notebook 组件,因为项目不需要太多的功能,只需要实现简单的 Notebook 功能就行。服务端 使用 Jupyter Server 来转发前端的请求给内核执行。内核 负责执行代码,将结果返回服务端。暂时使用 IPython Kernel,后面再接入平台的对象存储、数据库和 spark 集群等资源。部署 使用 Jupyter Hub 组件,用于为实现多用户提供 Notebook,即不同用户使用不同的 Jupyter Server 和 Kernel。
Authenticators :实现自定义登录鉴权,可以通过自定义 Authenticator 类并在配置文件中指定来实现。Spawners :用户登录时,Jupyter Hub 会用用户启动一个新实例(Jupyter Server + Kernel)。启动实例是通过 Spawner 实现的。官方提供了多种 Spawner 的实现,包括:本机新的Notebook Server进程、本机启动Docker实例、K8s系统中启动新的Pod、YARN中启动新的实例等等。这些实现本身是可配置的。如果不符合需求,也可以自己开发全新的 Spawner。后续我们需要接入 spark 和 数据库等资源,可以基于官方提供的 Spawner 进行定制,来接入资源。
整个架构如下图所示。不同的客户端通过 JupyterHub 进行登录验证后,可以通过 Jupyter Notebook 前端,访问对应的实例。每个实例即 K8s 的 pod,不同 pod 之间的资源是隔离的。
安装部署 下面在本地部署一个 Jupyter Hub,从各个组件的源码进行编译。虽然各个组件都可以通过扩展的方式去开发,但是后期如果有复杂的架构的话,可能需要修改相关的源码,所以通过在本地去编译各个组件的源码,去部署 Jupyter Hub。在本地完成开发后,可以打包成镜像,然后参考 社区的教程 部署到 K8s 上。
1 2 3 4 5 6 7 8 9 10 11 12 13 14 15 16 17 18 19 20 21 22 23 24 25 26 27 28 29 pip install ipykernel -i https://pypi.tuna.tsinghua.edu.cn/simple git clone https://github.com/jupyter-server/jupyter_server.git cd jupyter_serverpip install -v -e . cd ../git clone https://github.com/jupyterlab/jupyterlab.git cd jupyterlabyarn install pip install -v -e . jupyter lab build cd ../npm install -g configurable-http-proxy --registry=https://registry.npmmirror.com git clone https://github.com/jupyterhub/jupyterhub.git cd jupyterhubpip install -v -e . cd ../
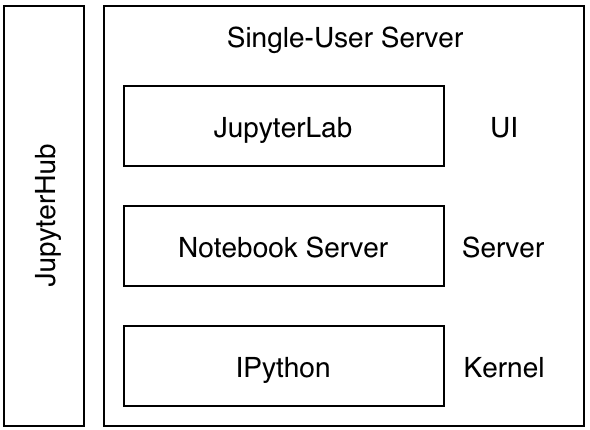
回顾一下之前的简化架构图,会发现上述命令将需要用到的重要组件都安装到了。 JupyterHub 管理多个用户,每个用户都有独立的单用户服务器实例,包括 Jupyter Lab 界面、Jupyter Server 和 IPython 内核。用户通过 JupyterLab 交互界面编写和执行代码,Jupyter Server 处理请求并与内核通信执行代码,最终将结果返回给用户,实现了多用户的交互式计算环境。
上面安装好了 Jupyter 的本地环境后,接下来介绍如何跑起来。
1 2 3 4 mkdir jupyterhub-config && cd jupyterhub-configjupyterhub --generate-config
按下面的配置进行修改,各个配置注释都有解释,也可以参考这里 。
1 2 3 4 5 c.JupyterHub.authenticator_class = 'jupyterhub.auth.PAMAuthenticator' c.Authenticator.allow_all = True
然后执行下面命令。
1 2 jupyterhub -f jupyterhub_config.py
控制台会类似输出下面的内容。
需要注意的是 8081 端口是 Hub API 的监听端口,用于与其他组件(如 Proxy 和 Spawner)进行通信的接口,只对 JupyterHub 的内部通信开放,不直接对外提供服务。
8000 端口是 JupyterHub Proxy 的监听端口,负责将用户的请求从这个端口转发到对应的 Jupyter Server 服务,这个端口通常对外开放,用户通过这个端口访问 JupyterHub 的 Web 界面。所以我们在浏览器打开 http://127.0.0.1:8000,输入电脑的登录账号和密码就可以登录成功。
1
2
3
4
5
6
7
8
9
10
11
12
13
14
15
16
17
18
19
20
21
22
23
24
25
[I 2024-08-15 18:25:27.339 JupyterHub app:3307] Running JupyterHub version 5.2.0.dev [I 2024-08-15 18:25:27.339 JupyterHub app:3337] Using Authenticator: jupyterhub.auth.PAMAuthenticator-5.2.0.dev [I 2024-08-15 18:25:27.339 JupyterHub app:3337] Using Spawner: jupyterhub.spawner.LocalProcessSpawner-5.2.0.dev [I 2024-08-15 18:25:27.339 JupyterHub app:3337] Using Proxy: jupyterhub.proxy.ConfigurableHTTPProxy-5.2.0.dev [I 2024-08-15 18:25:27.342 JupyterHub app:1882] Writing cookie_secret to /jupyterhub_cookie_secret [I 2024-08-15 18:25:27.764 alembic.runtime.migration migration:215] Context impl SQLiteImpl. [I 2024-08-15 18:25:27.764 alembic.runtime.migration migration:218] Will assume non-transactional DDL. [I 2024-08-15 18:25:27.768 alembic.runtime.migration migration:623] Running stamp_revision -> 4621fec11365 [I 2024-08-15 18:25:27.827 JupyterHub proxy:556] Generating new CONFIGPROXY_AUTH_TOKEN [I 2024-08-15 18:25:27.844 JupyterHub app:3376] Initialized 0 spawners in 0.003 seconds [I 2024-08-15 18:25:27.846 JupyterHub metrics:373] Found 0 active users in the last ActiveUserPeriods.twenty_four_hours [I 2024-08-15 18:25:27.846 JupyterHub metrics:373] Found 0 active users in the last ActiveUserPeriods.seven_days [I 2024-08-15 18:25:27.846 JupyterHub metrics:373] Found 0 active users in the last ActiveUserPeriods.thirty_days [W 2024-08-15 18:25:27.846 JupyterHub proxy:748] Running JupyterHub without SSL. I hope there is SSL termination happening somewhere else ... [I 2024-08-15 18:25:27.846 JupyterHub proxy:752] Starting proxy @ http://:8000 18:25:28.383 [ConfigProxy] info: Proxying http://*:8000 to (no default) 18:25:28.384 [ConfigProxy] info: Proxy API at http://127.0.0.1:8001/api/routes 18:25:28.763 [ConfigProxy] info: 200 GET /api/routes [I 2024-08-15 18:25:28.763 JupyterHub app:3690] Hub API listening on http://127.0.0.1:8081/hub/ 18:25:28.765 [ConfigProxy] info: 200 GET /api/routes [I 2024-08-15 18:25:28.765 JupyterHub proxy:477] Adding route for Hub: / => http://127.0.0.1:8081 18:25:28.767 [ConfigProxy] info: Adding route / -> http://127.0.0.1:8081 18:25:28.768 [ConfigProxy] info: Route added / -> http://127.0.0.1:8081 18:25:28.768 [ConfigProxy] info: 201 POST /api/routes/ [I 2024-08-15 18:25:28.768 JupyterHub app:3731] JupyterHub is now running at http://:8000
如果运行的时候发现没有 Kernel,那么可以通过如下命令来安装 Kernel,然后重启
1 2 3 4 5 6 7 jupyter kernelspec list python -m ipykernel install --user --name 内核名称 --display-name "内核显示名称" jupyter kernelspec remove 内核名称
自定义认证 调试 首先介绍如何在 Pycharm 中将 Jupyter 跑起来,方便进行开发调试(如果你不是 Python 开发的话,相信对你会有帮助😄)。
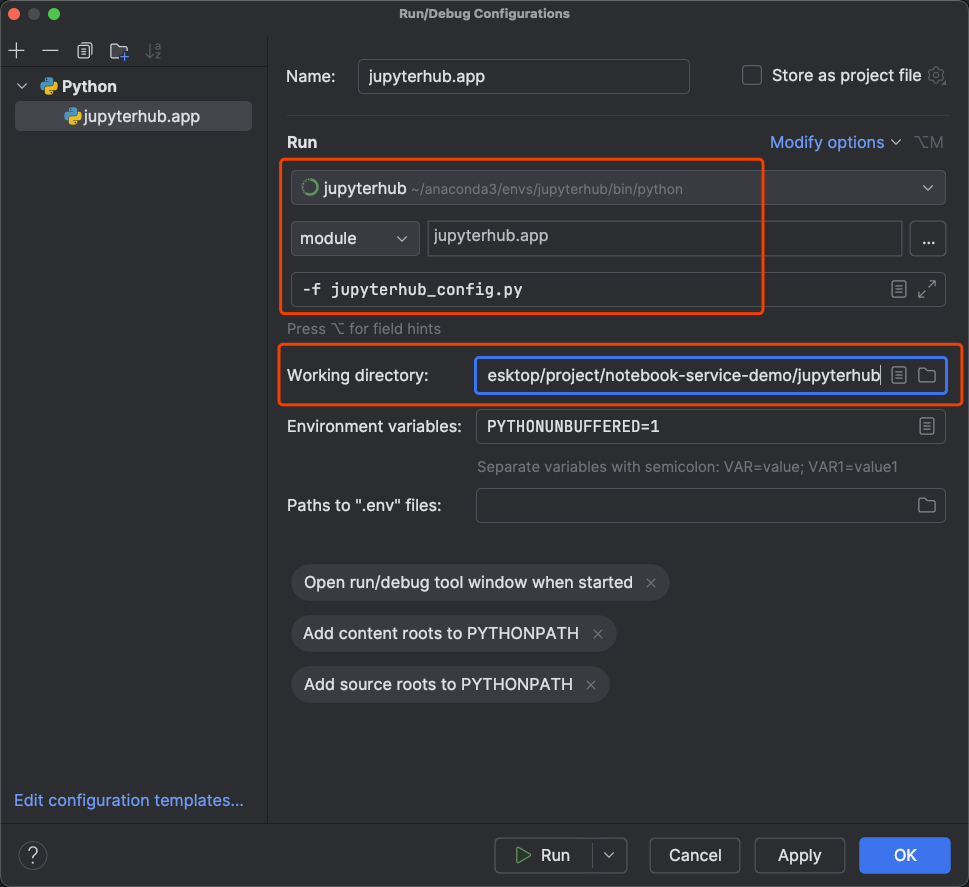
添加如下面图片中的运行配置,需要注意的需要是以 module 的方式去运行项目的入口 jupyter/app.py 文件,然后设置以下命令参数 -f xx,最后设置项目的工作目录为 jupyterhub 项目的根目录。然后就可以愉快的运行调试了👍。
下面解释一下为什么需要以 module 的方式去运行入口文件。
以 scripy 方式运行文件相当于直接使用 python xxx。
以 module 方式运行文件相当于使用python -m xxx。
路径处理 : 运行 script 时,Python 会根据文件的物理路径直接执行,而运行 module 时,Python 会处理模块路径并将模块的顶级目录添加到 sys.path。
导入方式 : 在 module 运行时,Python 可以处理相对导入,而 script 运行时则不能直接处理相对导入(因为脚本是作为独立的 __main__ 执行的,没有包的上下文)。
适用场景 : script 方式适合单文件或测试文件的简单执行,而 module 方式则适合复杂的包结构,尤其是涉及包内相对导入或模块内部的命名空间管理时。
这两种方式的选择取决于你的项目结构和需要执行的代码位置。在大型项目或需要调试模块化代码时,使用模块方式通常更合适。如果喜欢通过命令行进行调试的话,也可以使用 pdb (类似 gdb)来调试项目。
实现 由于我们对 Jupyter Notebook 进行了二次开发,需要将其作为一个服务集成到我们的图数据分析平台中。因此,我们需要自定义JupyterHub 的认证机制,使其与平台中的认证机制一致。目前,我们的图数据分析平台采用基于 JWT 的令牌认证方式。因此,我们需要在 JupyterHub 中实现基于 JWT 的自定义认证机制。
下面是认证过程的时序图,过程如下所述:
用户访问入口 : 用户通过浏览器访问 Jupyter Hub,最初的请求到达 Proxy。
跳转 SSO : 如果验证 token 失败,Proxy 会将请求重定向到 SSO 系统进行认证。
SSO 登录 : 用户完成 SSO 登录,SSO 系统将结果回调到 Hub。
实例申请和创建 : Hub 接收回调后,为用户请求在 本地创建一个新的 Jupyter Server 实例。
实例创建 : 创建实例后,返回相关信息给 Hub。
配置和跳转 : Hub 设置转发规则,然后将用户的请求重定向到 <username> 路径。
访问 JupyterLab : 用户浏览器访问 <username> 路径,加载 Jupyter Lab 界面。
代码执行和结果返回 : 用户在 Jupyter Lab 中请求执行代码,转发给 Jupyter Server 执行,最终返回执行结果给用户浏览器。
下面将介绍如何实现 Jupyter Hub 的自定义认证。
我们使用 DockerSpawner 来创建新的 Jupyter Server 实例,会为每个用户创建一个容器来运行 Jupyter Server。所以,Jupyter Hub 会和用户容器里的 Server 通信。如果 Jupyter Hub 部署在本地的话,和容器通信是不方便的,所以我们将 Jupyter Hub 放在容器里面部署,将 Jupyter Hub 容器 和 用户实例容器放在一个 network 里面,这样这些容器就可以相互通信。也许你会有疑问,Jupyter Hub 容器里面没有安装 docker,DockerSpawner 如何创建容器呢?我们可以将本地主机的 Docker 守护进程的 Unix 套接字文件(/var/run/docker.sock)挂载到 Jupyter Hub 容器中的相同位置,这样容器内的应用可以像主机上的任何 Docker 客户端一样,与 Docker 守护进程通信,执行 Docker 命令。
首先,我们通过编写一个 Dockerfile 来安装 Jupyter Hub,我们希望能在本地连接这个容器进行开发调试,所以我们像之前一样,自己编译这些组件。下面是 Dockerfile 的内容。
1 2 3 4 5 6 7 8 9 10 11 12 13 14 15 16 17 18 19 20 21 22 23 24 25 26 27 28 29 30 31 32 33 34 35 FROM python:3.12 RUN apt-get update && apt-get install -y \ git \ vim \ curl \ openssh-server \ apt-transport-https \ ca-certificates \ gnupg-agent \ software-properties-common \ && rm -rf /var/lib/apt/lists/* WORKDIR /srv/jupyterhub RUN mkdir /var/run/sshd RUN echo 'root:password' | chpasswd RUN sed -i 's/#PermitRootLogin prohibit-password/PermitRootLogin yes/' /etc/ssh/sshd_config RUN sed -i 's@session required pam_loginuid.so@session optional pam_loginuid.so@g' /etc/pam.d/sshd EXPOSE 22 8000 CMD service ssh start && bash
执行下面的命令构建镜像。
1 docker build -t jupyterhub-dev .
执行下面的命令创建 network。
1 docker network create jupyterhub
执行下面的命令运行容器,映射本地存储和端口。
1
2
3
4
5
6
7
docker run -it --name jupyterhub-dev \ -v /var/run/docker.sock:/var/run/docker.sock \ --net jupyterhub \ -v /Users/tom/notebook-service-demo/docker-image/source-code:/srv/jupyterhub \ -p 8000:8000 \ -p 16022:22 \ jupyterhub-dev
然后在本地的 /Users/docker-image/source-code 目录下,clone Jupyter Server、Jupyter lab 和 Jupyter Hub 的源码。执行 docker attach jupyterhub-dev 进入容器的命令行,按照“安装部署”小节中的内容进行编译刚刚 clone 下来的源码。注意编译 Jupyter Lab 的时候,如果报错,先尝试运行下 yarn install 。
接下来,在本地的 Pycharm 中打开映射的文件夹里的 JupyterHub 源码,然后通过 SSH 使用容器内的编译器。这样就可以愉快的使用容器内的环境进行开发了,本地更新的代码也会同步到容器内。按照上面“调试”小节中的内容去操作就行。
下面是实现自定义认证的代码。
我们先编写一个自定义认证器,用于实现 JWT 的验证逻辑。
1
2
3
4
5
6
7
8
9
10
11
12
13
14
15
16
17
18
19
20
21
22
23
24
25
26
27
28
29
30
31
32
33
34
35
36
37
38
39
40
41
42
43
44
45
46
47
48
49
50
51
52
53
54
55
56
57
58
59
60
61
import jwtfrom jupyterhub.auth import Authenticatorfrom tornado import genfrom jwt.exceptions import ExpiredSignatureError, InvalidTokenErrorimport redisclass JWTAuthenticator (Authenticator ): secret = "your_secret" authKeyFormat="auth_token_key:{}" def __init__ (self, **kwargs ): super ().__init__(**kwargs) self .redis_client = redis.StrictRedis(host='redis' , port=6379 , db=0 ) def get_user_id_from_token (self, token ): try : self .log.info(f"Decoding token: {token} " ) payload = jwt.decode(token, self .secret, algorithms=['HS384' ]) self .log.info(f"Decoded payload: {payload} " ) user_id = payload.get("sub" ) if user_id: return user_id else : self .log.warning("No user ID found in token" ) return None except ExpiredSignatureError: self .log.warning("Token has expired" ) return None except InvalidTokenError as e: self .log.warning(f"Invalid token: {e} " ) return None except Exception as e: self .log.warning(f"Error decoding token: {e} " ) return None @gen.coroutine def authenticate (self, handler, data=None ): token = handler.request.headers.get('Authorization' , None ) if not token: self .log.warning("No Authorization header provided" ) return None user_id = self .get_user_id_from_token(token) authKey = self .authKeyFormat.format (user_id) if user_id: user_exists = self .redis_client.exists(authKey) if user_exists: return user_id else : self .log.warning(f"User ID {user_id} not found in Redis" ) return None else : return None
然后编写配置文件使用上述自定义认证器。
1
2
3
4
5
6
7
8
9
10
11
12
13
14
15
16
17
18
19
20
21
22
23
24
25
26
27
28
29
30
31
32
33
34
35
36
37
38
39
40
41
42
43
44
45
46
from jupyterhub.auth import LocalAuthenticatorfrom tornado import genimport osimport syscurrent_dir = os.path.dirname(os.path.abspath(__file__)) print (current_dir)sys.path.insert(0 , current_dir) from jwt_authenticator import JWTAuthenticatorfrom dockerspawner import DockerSpawnerc = get_config() c.Authenticator.allow_all = True c.JupyterHub.authenticator_class = JWTAuthenticator c.Spawner.default_url = '/lab' c.JupyterHub.spawner_class = DockerSpawner c.DockerSpawner.image = 'jupyter/minimal-notebook' c.DockerSpawner.network_name = 'jupyterhub' c.JupyterHub.hub_ip = '0.0.0.0' c.JupyterHub.hub_connect_ip = 'jupyterhub-dev' c.JupyterHub.tornado_settings = { 'xsrf_cookies' : False , }
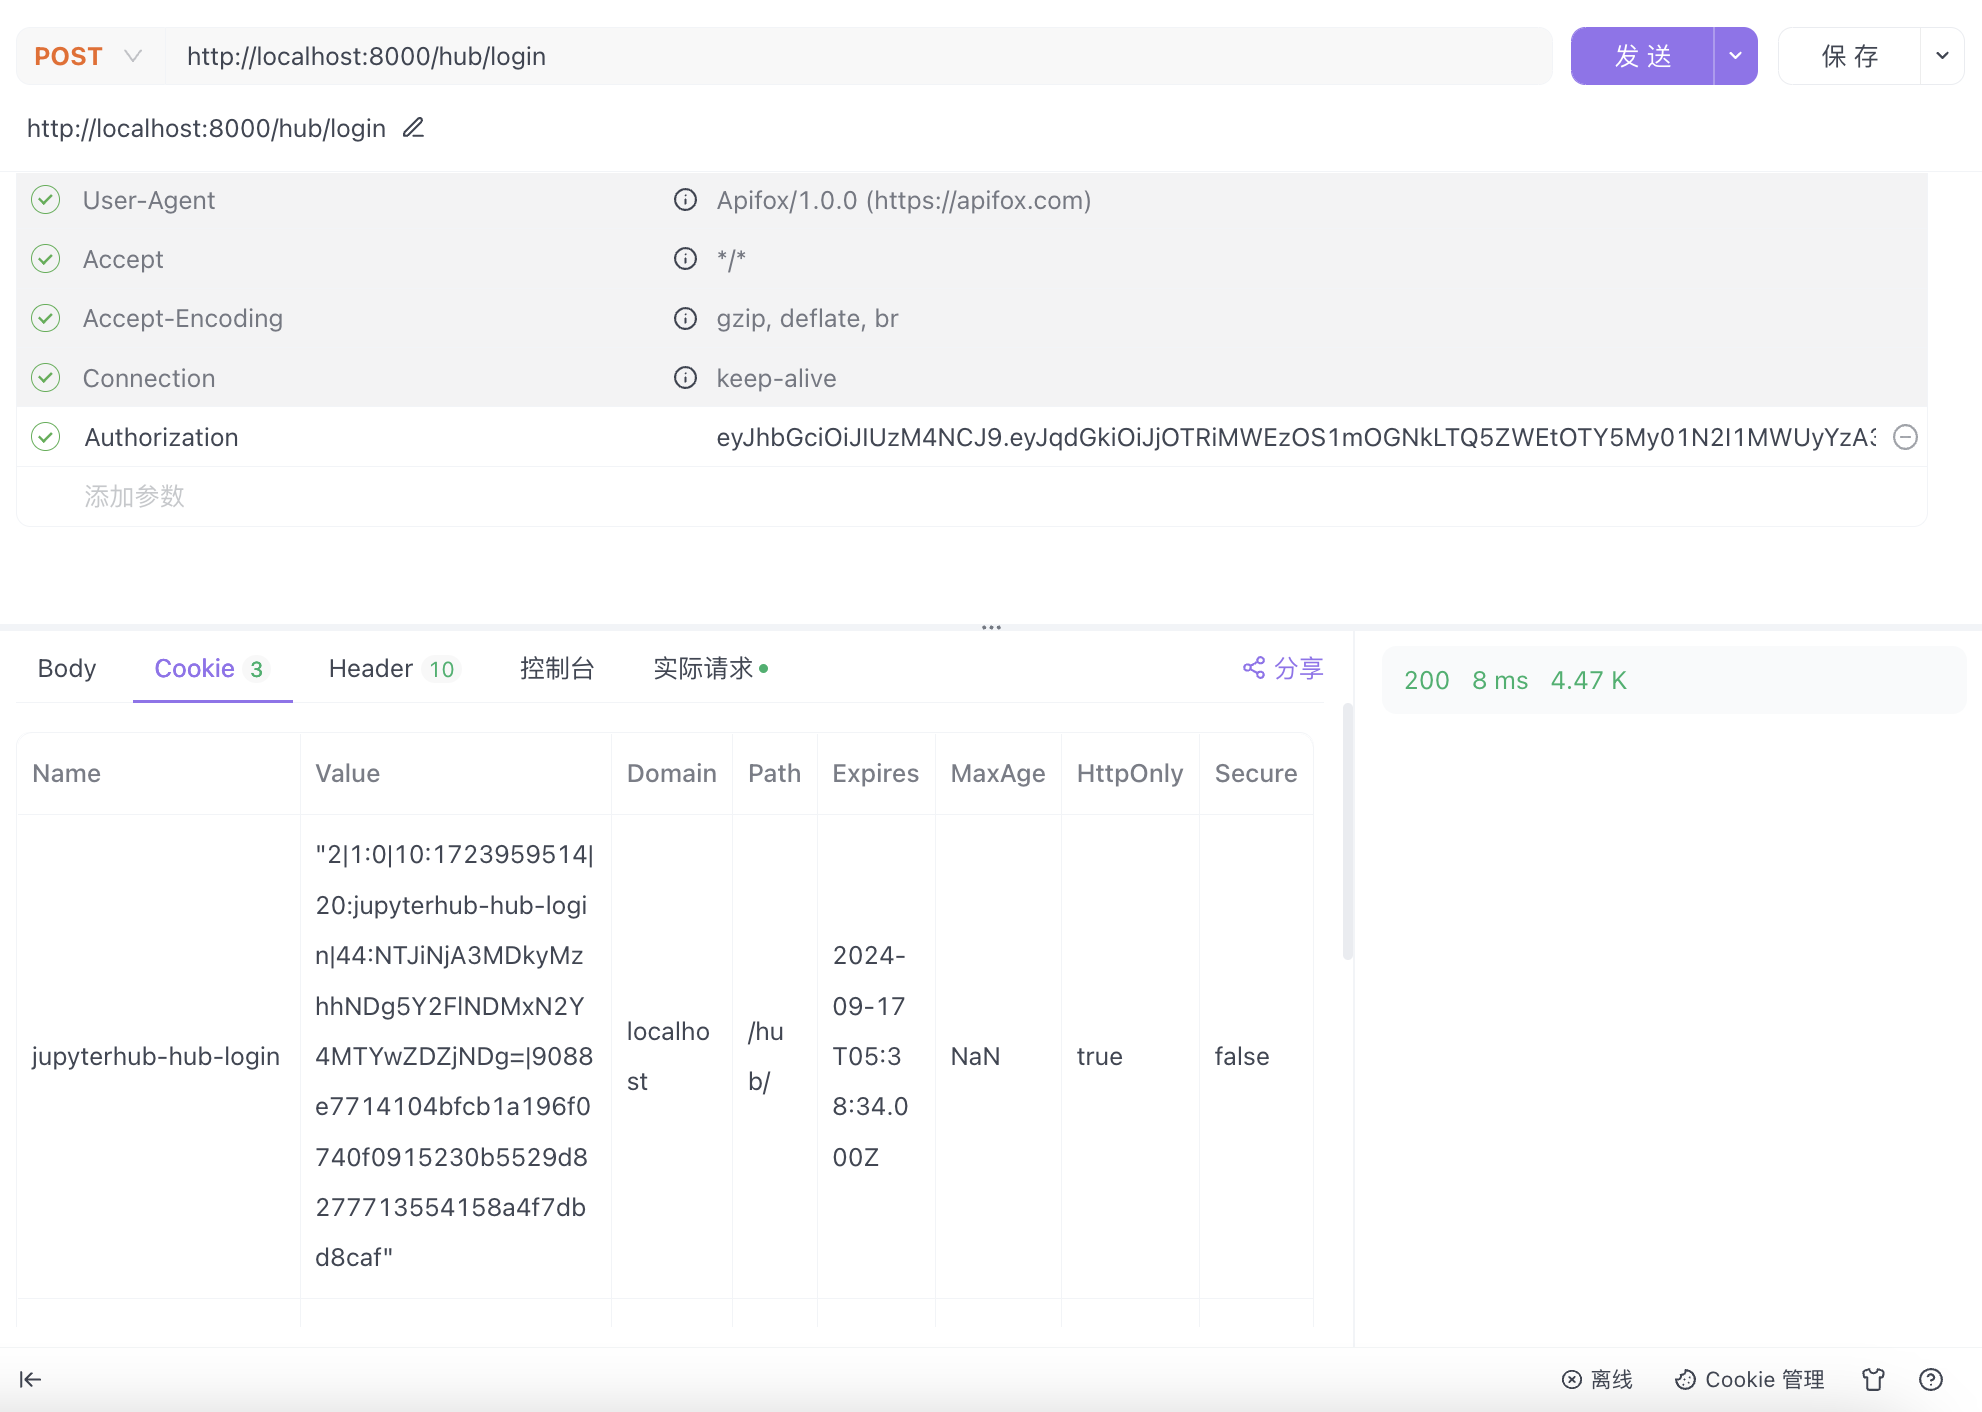
然后使用上面的配置文件启动 Jupyter Hub 。通过 apifox 发送下面的请求,将获取的 cookie 存入到浏览器上的 http://localhost:8000 上,打开 http://localhost:8000/hub/。如果可以成功打开,就是成功啦😄。
总结 这篇文章介绍了 Jupyter 二次开发的初步思路。首先介绍项目的需求。接着我们的进一步介绍架构设计,使用了哪些组件。然后介绍了如何编译安装部署 Jupyter Hub 及相关组件。最后在 docker 上实现了 Jupyter Hub 的自定义的 JWT 认证。
需要注意的是,目前的我们的架构会存在下面这些问题,这些问题也是之后需要优化。
hub 单点故障会导致全部实例使用不了
文件存在实例本地,hub 挂掉就找不到了
升级比较复杂,需要给挨个实例升级
参考 Zero to JupyterHub with Kubernetes
Jupyter Hub Authenticators
字节博客
美团博客


